Arquivo | World Bread Day RSS feed for this section

WBD#16 Pão Rustico com Levain / Rustic sourdough bread

16 out

1476651230403

World Bread Day 2016 (October 16)

Scroll down for English please

Mais um World Bread Day e a querida Zorra convida a exaltar esse alimento sagrado que é o Pão. Apesar de não postar no blog há muito tempo, tenho cozinhado e feito muitos Pães. Aliás, o assunto por aqui é Fermentação Natural. Depois de várias tentativas frustradas de formar um Levain, o meu deu certo e tenho feito Pães deliciosos!

Levain, sourdough, surdeg, lievito madre…chame como quiser. Mas vá lá e aventure-se nesse mundo da fermentação natural, não tem volta!

Essa receita é adaptada para Levain…

Pão Rústico com Levain

Alimente seu Levain: 200g Levain, 100g de água mineral e 100g farinha de trigo (usei orgânica). Mexa muito bem , coloque num vidro sem tampar totalmente em um lugar sem luz direta nem corrente de vento e deixe descansar 6 horas.

Agora a massa: faça autólise. Usei 300g trigo branco orgânico e 175g trigo integral orgânico. Misture 190g água mineral e mexa bem. Deixe em repouso por 1 1/2 hora.

Agora vamos fazer o pão: no bowl da máquina de fazer pão coloque as farinhas que foram misturadas à água e estiveram em repouso. Junte 220g do Levain reformado. Misture bem. Acrescente 10g sal aos poucos, com a máquina de pão ligada. Junte 2 colheres de sopa de mel, 2 colheres de sopa de semente de girassol, 2 colheres de sopa de gergelim tostado e 2 colheres de sopa de Cranberries secas. Ciclo massa (1 /12 horas).

Ao final do ciclo retire a massa e coloque sobre uma mesa de granito levemente enfarinhada e dê a forma levemente alongada. Coloque para crescer com a dobra para cima, num banneton com um pano enfarinhado. Cubra e deixe crescer por umas 6 horas.

Uma hora antes de completar as 6 horas, coloque uma panela de ferro tampada no forno ligado no alto.

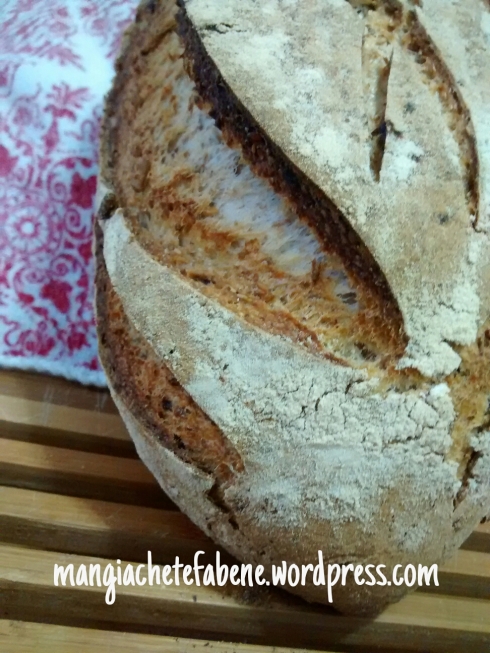
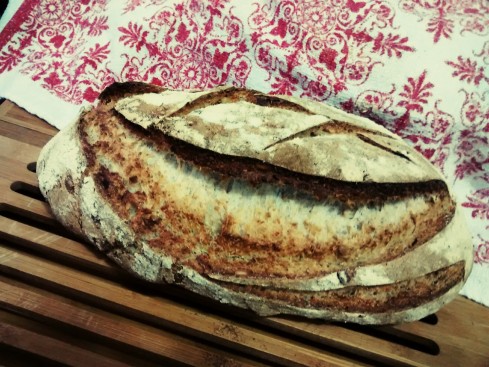
Na hora de assar coloque fubá no fundo da panela e coloque o Pão com a dobra para baixo. Faça o corte com gilete e tampe, levando novamente ao forno.

Deixe de 20-25min até começar a dourar,destampe e deixe dourar bem.

Deixe esfriar completamente numa grade para cortar.

Não deixe de conferir as postagens dos blogs :

http://www.brisandonacozinha.com/2016/10/focaccia-de-azeitonas-e-linguica-caseira.html

http://receitasetruquesdaclarinha.blogspot.com.br/2016/10/wbd-2016-fogaca-da-feira.html

http://lasrecetasdemarichuylasmias.blogspot.com.br/2016/10/chapata-dia-mundial-del-pan-2016.html

http://amigos-da-cozinha.blogspot.com.br/2016/10/pao-rosca-doce.html

https://lemonandvanilla.blogspot.com.br/2016/10/pumpkin-no-knead-bread-with-crispy.html

http://decozinhaemcozinha.blogspot.com.br/2016/10/pao-estaladico-de-centeio.html

http://aboboramenina-cristina.blogspot.com.br/2016/10/wbd-2016-pao-caseiro-tipo-bisnaguinha.html

http://www.receitasparaafelicidade.com/2016/10/pao-de-ricotta.html

http://sao33.blogspot.com.br/2016/10/brioche-feuilletee-para-o-world-bread.html

http://www.cozinhandopara2ou1.com.br/2016/10/16/pain-au-levain-para-o-world-bread-day-2016/

http://www.anaclaudianacozinha.com/2016/10/paezinhos-de-leite.html

http://www.sosimplesassim.com.br/2016/10/16/world-bread-day-2016/

http://www.diariosemlactose.com/2016/10/focaccia.html

http://nacozinhadacarina.blogspot.com.br/2016/10/pao-com-salpicao-e-queijo.html

http://cozinharehpreciso.blogspot.com.br/2016/10/rosca-chelsea-world-bread-day.html

http://saborear-saboreandoavida.blogspot.com.br/2016/10/pao-de-aveia-light-para-o-world-bread.html

http://www.caldeiraodabruxasolar.com/2016/10/pao-flor-com-goiabada-world-bread-day.html

http://orapitangas.blogspot.com.br/2016/10/wbd-2016-coroa-de-laranja-com-frutas.html

http://www.nacozinhabrasil.com/2016/10/simit-o-pao-turco.html

http://www.nabiroskinha.com/2016/10/scones-world-bread-day-dia-mundial-do.html

xxxxxxxxx


img_20161016_185026

Another World Bread Day arrived and dear Zorra invites us to cheer up on bread, this sacred food. Even though I haven’t posted here for a long time I Go along cooking and baking a lot.

After some not successful attemps on creating a sourdough, I finally succeded and have been baking good breads latelly.

Do not give up, give yourself a chance and go for your starter, it sure pays off. There is no way back. Levain, sourdough, surdeg, lievito madre…

This recipe is addapted for Levain…

Rustic Sourdough Bread

Feed your starter: 200g starter, 100g water and 100g White flour (organic is better). Mix well and leave it for 6hours in a dark and calm place.

Mix 300g white flour and 150g whole wheat flour (both organic) with 190g mineral water. Let the autolisis take place. Wait 1 1/2 hour and then we can make the dough.

In the bowl of your bread machine combine the flours and 220g of the fed starter. Mix well. Add 10g of Sea salt little by little. Then add 2 table spoons of sunflower seeds, 2 table spoons of white toasted Sesame seeds and 2 table spoons of dried Cranberries.  Go for Dough Cicle.

It will go for 1 1/2hours.  After it ends put the dough on a lightly floured granite surface and shape your bread. Put  seam side up to proof on a floured cloth on a banneton. Cover with another cloth and leave it for 6hours.

One hour before the proffing time ends light your oven and put your iron pan with the lid on inside. It should be very hot.

After one hour, dust the pan with corn flour and put your bread with seam side down. Make the cut on the surface using a razor blade and put the lid on. Take the pan to the oven and wait around 20-25 minutes. Then take the lid of the pan and let the crust golden, sometime around 10-15 minutes, depending on your oven.

Take the bread out of the pan and let it cool completelly on a rack.

Onion and pork meat crackling rolls–Pãezinhos de cebola e carne de torresmo

16 out

Please scroll down for English

DSC09537

World Bread Day 2013 - 8th edition! Bake loaf of bread on October 16 and blog about it!

Esses pãezinhos são fáceis de fazer e deliciosos, agradam a gregos e troianos, além de ficarem lindos! Podem ser feitos com ou sem recheio, saborizados ou não, fica a gosto do freguês.

A receita veio da mãe da Priscila, que é mãe de um amigo do meu filho. Papo vem, papo vai sempre acabamos conversando sobre comida e ela me passou essa joia.

Com eles participo do lindo e inspirador evento World Bread Day´13, criado pela Zorra, http://www.kochtopf.me/announcing-world-bread-day-2013-8th-edition  .

DSC09533

Pãezinhos de cebola e carne de torresmo

(22 pães médios)

1 xícara= 240ml

Ingredientes:

  • 3 cebolas médias
  • 3/4 xícara de óleo
  • 1 1/2 xícara água morna
  • 3 ovos inteiros (temperatura ambiente)
  • 1 colher (sopa) sal
  • 2 colheres (sopa) açúcar
  • 45g fermento fresco para pão
  • 8 colheres de sopa de carninha de torresmo *
  • aproximadamente 8 xícaras de farinha de trigo (pode        ser necessário usar um pouco mais)

Modo de fazer:

*minha avó sempre fazia a carne do torresmo assim – retirava o couro da barriga do porco, passava a gordura e a carne (cruas) no moedor de carne ou processador de alimentos. Fritava numa frigideira grossa até que a gordura toda derretesse e só sobrasse a carne. Retirava com escumadeira a carne frita, espremia no espremedor de batatas para ficar bem sequinha e usava em pães, pastéis assados, bolinhos…onde quiser. A gordura que sobra irá endurecer e pode ser usada para fazer arroz, refogados, feijão, ensopados, carne assada, frituras…use sua imaginação. Achei um site que mostra como é esse processo. Veja mais aqui.

  • No liquidificador coloque todos os ingredientes menos o trigo e a carne do torresmo e bata bem.
  • Coloque a mistura numa vasilha grande, coloque a carne do torresmo e vá agregando o trigo até dar ponto na massa. As vezes que fiz resolvi contar e foram aproximadamente 8 xícaras de trigo. Dependendo do local onde você está no planeta, dependendo da temperatura e do tipo do trigo pode haver uma pequena variação.
  • Sove a massa até ficar elástica e macia.
  • Deixe a massa crescer numa vasilha (levemente untada com óleo) coberta com um pano, preferencialmente num local quente sem corrente de ar. Até dobrar de volume.
  • Faça pãezinhos redondinhos ou tipo mini hot dogs e coloque em assadeira untada com manteiga. Deixe um espaço entre os pãezinhos pois ainda vão crescer. Com uma tesoura faça piques na parte de cima do pão.
  • Deixe novamente dobrar de volume.
  • Asse em forno pré-aquecido até dourar e perfumar sua casa!
  • Deixe esfriar numa grade.
  • Para usar no lanche da tarde, fazer sanduíches para um encontro de amigos, lanche da escola, acompanhar uma sopa ou salada…ficam deliciosos!

Obs: a mãe da Priscila costuma também colocar calabresa picada na massa, bate tudo junto no liquidificador. Outra dica é rechear os pãezinhos com frango e catupiry…hummm!

xxxxxxxxxxxxxxxxxxxxxxxxxxxxxxxxxxxxxxxxxxxxxxxxxxxxxxxxxxxxxx

These beautiful rolls are easy to make and delicious, a crowd pleaser. You can make them with or without filling, herbs or just plain, whatever suits your taste.

The recipe has been given to me by the mother of my son´s friend. As we wait for the kids to come out of school we are always chatting about food and she gave me this great recipe from her mom. It´s a keeper!

With these rolls I participate in the inspiring event World Bread Day´13, created by Zorra, http://www.kochtopf.me/announcing-world-bread-day-2013-8th-edition .

DSC09535

Onion and pork meat crackling rolls

(22 medium rolls)

1 cup = 240ml

Ingredients:

  • 3 medium onions
  • 3/4 cup vegetable
  • 1 1/2 cup lukewarm water
  • 3 whole eggs (room temperature is best)
  • 1 tablespoon salt
  • 2 tablespoons sugar
  • 45g fresh bread yeast
  • 8 tablespoons pork meat cracklings *
  • around 8 cups of bread flour, or a little more if necessary

How to:

* my grandma always fixed pork meat cracklings, how she did? Take the belly fat (with meat) and grind it or process it. Put it in a heavy pan and let the fat melt and the meat became golden. It looks much like fried pork. Take the cracklings out and put them in the potato masher and press it well to get all the fat out. The cracklings can be used in breads, pastry, salads…hummm! The fat can be used to fix rice, beans, stews, deep fry…use your imagination. The method is very well shown here.

Make the bread:

  • In a blender put all the ingredients but the bread flour and cracklings. Mix well.
  • In a big bowl put the mixture and the pork meat. Slowly add the bread flour until you feel the dough is smooth and good to knead. I counted 8 cups, can be a little more or a little less.
  • The dough shall rise in a oiled bowl and covered with a clean cloth until doubled. Warm and draft free place.
  • Shape the rolls or mini hot dog buns and place them in a buttered pan. Leave some space for them to rise again.
  • Using scissors make two cuts in the surface of the rolls. It releases the air as the bread bakes.
  • Bake in a preheated oven until golden and your house smell wonderful!
  • Let the rolls cool in a griddle.
  • You can have them for an afternoon snack, make sandwiches for a friends get together, school snack, to pair with soup or salad….They´re delicious!

PS: my friends´ mom also makes them with italian sausage, she just blends the sausage with the dough ingredients. Sometimes she makes them filled with soft cheese and shredded chicken…yummi!

DSC09470

This picture shows how the inside rolls look!!! Very, very good looking,huh? These were made in another day, without the cracklings!

Pain Viennois au Chocolat

1 abr

Please scroll down for English

DSC08406

O aroma e o sabor dos pães franceses com recheio de chocolate são uma tentação e apesar de já fazer um bom tempo que estive na França lembro muito bem dos deliciosos “Pain au chocolat” que experimentei! As crianças adoram e  me incluo na lista!

BBD #57

Assim que vi que o Bread Baking Day #57 era uma festa de Blogwarming para o novo blog da Zorra e que ela pedia para levar um pão, resolvi que faria um pão recheado com chocolate! Esta receita me cativou logo que vi as fotos! Tinha de testar! Adorei! Ficou super gostoso e bonito! Além disso foi um pão com cara de Páscoa! Espero que tenham tido um doce feriado!

O nome é muito chique, não? Adorei! Minha sobrinha me  pediu 3 vezes para passar a receita para minha irmã! E meu Galego adorou, ainda mais que é fã de chocolate e há tempos pedia um pão assim! Acho que fez sucesso!

Levei para a família experimentar  no feriado e não deu tempo para tirar fotos do pão cortado…

A receita é ligeiramente adaptada daqui.

Pain Viennois au Chocolat

(xícara 240ml)

90g de manteiga sem sal (temperatura ambiente)

5 ovos (temperatura ambiente)

100ml de leite

10g sal

10g leite em pó

40g açúcar

15g fermento fresco para pão

550g farinha de trigo

170g de chocolate meio amargo em pedacinhos

Para pincelar: 1 ovo batido

                 açúcar de confeiteiro

Modo de fazer: num bowl misture com os dedos a manteiga, leite, os ovos, leite em pó, açúcar e fermento. Junte a farinha e numa batedeira com gancho bata na velocidade baixa por 5 minutos. Aumente a velocidade para média e bata por 15 minutos.

(Adicionei um pouquinho mais de trigo, cerca de 1/4 de xícara, até que a massa estivesse boa, sem grudar.)

Cubra o bowl com plástico filme e deixe dobrar de volume, cerca de 1 hora.

DSC08404

Retire a massa do bowl e sove por 2 minutos. Divida em 4 partes iguais e achate cada uma das partes. Recheie com chocolate meio amargo em pedacinhos e feche a massa para formar rolos de 20cm.

(Resolvi fazer 3 pães, dois com recheio de chocolate e um sem recheio. Um dos que tinha chocolate fiz redondo para ver como ficava. Lindos! O pão que não tinha recheio ficou bem mais escuro…esqueci no forno e quase queimou!!!!

A massa não é muito doce, fica muito gostosa com o chocolate dentro e também sem nada, para comer no café da manhã ou num chá da tarde! Farei novamente!)

Deixe crescer novamente por 30 minutos em forma untada com manteiga. Pré-aqueça o forno na temperatura média. Antes de levar ao forno pincele ovo batido e polvilhe açúcar de confeiteiro e faça cortes com uma gilete ou faca afiada.

Asse até dourar. Deixe os pães esfriarem numa grade.

xxxxxxxxxxxxxxxxxxxxxxxx

DSC08413

As soon as I read the theme proposed by Zorra for the Bread Baking Day #57, Blogwarming Party, and that she asked to take a bread as a blessing for her new blog, I knew I had to bake a chocolate filled bread!

It took me back to the time I went to France…the splendid aroma and taste of the Pain au Chocolat so loved by the children (and myself too!)! This recipe caught my eyes and my stomach! Loved the results.

I decided to bake 3 breads instead of the 4 called for in the recipe. One of them I did not put filling and it was a great call for breakfast or tea time.

I took the breads to a family reunion during Easter and everyone loved but did not get the chance to take pictures of the breads once cut. My son was asking me to bake a bread with chocolate for ages and was so happy! And my niece asked me 3 times to send her mom the recipe…guess they liked it!

DSC08406

The recipe came from here and is slightly changed by me. Just a bit.

Pain Viennois au Chocolat

(cup 240ml)

90g unsalted butter (room temperature)

5 whole eggs (room temperature)

100ml whole milk

10g salt

10g powder milk

40g sugar

15g fresh yeast

550g white flour

170g unsweetened chocolate broken in small pieces

Eggwash: 1 beaten egg

           confectioner sugar

Directions: in a bowl mix with your fingers the butter, milk, eggs, powder milk, sugar and yeast. Add the flour and in a stand mixer with a whisk beat at low for 5 minutes. Put in medium and beat for 15 minutes.

(I added a little extra flour, about  1/4 cup, until it wasn´t sticking anymore.)

Cover the bowl with cling film and let it rise for about one hour, until doubles volume.

Put the dough in a floured surface and knead for 2 minutes.  Cut in four parts and flatten each one. Fill with the chocolate and form logs of dough, around 20cm.

(I decided to bake 3 breads, two filled with chocolate and one plain.  One of the choclate filled ones I shaped round, just for kicks! Lovely! The plain bread almost burned in the oven…I was busy doing something else…!

The dough is not too sweet, great with the choclate and also just plain! I am certainly baking this bread again!)

Let it rise again for 30 minutes in a buttered sheet. Pre heat the oven to medium. Just before taking to the oven brush the breads with the eggwash and sprinkle confectioner sugar. Cut the surface with a sharp knife. Bake until golden, around 25 minutes. Let the loaves cool in a wire rack.

Pain à l’ancienne

1 dez

DSC07384

Scroll down for English, please

Desta vez consegui me programar para participar do Bread Baking Day #54, um evento criado pela Zorra do blog Kochtopf há pouco mais de  cinco anos e que já tive o prazer de participar algumas vezes. Desta vez quem está fazendo as honras é a Stefanie, do Hefe und Mehr.  O tema que ela escolheu é Overnight , isto é, receitas de pão que crescem durante a noite.

Confesso que não tinha feito muitos pães que necessitam de fermentação durante a noite, foram uns quatro ou cinco, muitas vezes deixei de fazer pois simplesmente sou um pouco desorganizada e deveria ter começado o pão no dia anterior…acabava indo com a receita mais rápida…

Escolhi a receita do Pain à l´ancienne, um pão rústico cujo preparo necessita de fermentação mais longa, tema do evento. Além da fermentação mais demorada para intensificar o sabor do pão, resolvi mudar um pouco a receita e assar o pão na caçarola oval de ferro que ganhei dos meus pais, tipo um Dutch Oven…sonho antigo!

DSC07390

Estou super entusiasmada…o pão é fácil de fazer, confiem em mim, consegui seguir os passos com uma pequena de 1 ano e 8 meses correndo pela casa e precisando de atenção constante! O segredo é seguir a receita (ou quase) e usar o método Dutch Oven se puder para conseguir a casca crocante e o aspecto mais rústico das padarias mais descoladas! Assar o pão dentro da panela de ferro ou similar resolve o grande dilema dos padeiros caseiros, a falta de um forno com temperatura alta e umidade suficiente para assar o pão e ao mesmo tempo deixar a crosta bem crocante como na padaria.

Cuidado com a panela quente, luva para não queimar a mão é super necessária!

Estou tão maravilhada com o resultado! Nem acredito que fiz essas belezas! E o sabor? Uma ajudinha de Santa Isabel …e o resultado são pães lindos, crocantes e deliciosos! Ah, Santa Isabel é a padroeira dos padeiros…

DSC07394    DSC07396

Aqui vai a receita então, do Six top food blog com minhas alterações.  Consegui dois pães com 600g e 700g. Guarde em saco de pano para preservar a crocância.

Pain à l’ancienne

766g de trigo branco (pode ser necessário um pouco mais)

16g sal

12g fermento biológico seco

538 a 680g de água gelada

Modo de fazer:

  1. Coloque o trigo, sal, fermento e 538g de água gelada no bowl da sua batedeira e com as pás misture por 2 minutos. Se a massa parecer seca use mais água gelada ou mais trigo se parecer muito úmida. Eu tive que usar quase toda a água.
  2. Com uma espátula raspe a massa das laterais do bowl e troque para o gancho de massa.
  3. Misture por 5 a 6 minutos ou faça como eu, use a máquina de fazer pão para fazer todo o trabalho, desde o passo 1.  Você pode fazer na mão se preferir…
  4. O ponto é quando ao retirar um pouquinho da massa com as mãos você puxa contra a luz e vê através. Se a massa se partir volte a misturar até que esteja no ponto. A massa dever ser grudenta.
  5. Transfira a massa para um bowl grande untado com óleo e cubra com plástico filme. Leve à geladeira durante a noite. * Eu tive que trocar o bowl no meio do caminho…vi que iria transbordar, então não economize…deixe espaço na geladeira para sua massa!
  6. Na manhã do outro dia vá espiar…estará linda e crescida. A minha quase tinha dobrado de volume, apesar da receita original dizer que isso não aconteceria…só teria crescido um pouco…
  7. Deixe o bowl em temperatura ambiente por 4 a 5 horas. (Deixei quase 6…minha manhã foi agitada!)
  8. A massa deve estar pelo menos o dobro do volume anterior.
  9. Numa superfície enfarinhada coloque sua massa com cuidado. Coloque farinha sob a massa e sobre ela.  Não é para sovar.
  10. Abra a massa com as mãos num retângulo de 20x15cm e corte ao meio.  Deixe a massa relaxar por 5 a 10 minutos.

DSC07375

# Como eu fiz: Coloque sua panela (com a tampa) tipo Dutch Oven no forno e deixe aquecer bem a 280ºC cerca de 1 hora.

    Forme seus pães, eu resolvi fazer pães tipo compridos e mais gordinhos. Com uma gilete fiz cortes na superfície dos pães e coloquei cada um sobre um jogo americano de plástico duro enfarinhado com fubá, seja generosa(o).  Deixei crescer novamente enquanto o forno esquentava, uma hora aproximadamente.  Caçarola de ferro com a tampa dentro do forno, para ficar pelando de quente!

DSC07377

     Com super cuidado coloquei o primeiro pão, deslizando para dentro da panela e depois tampei. Abaixei o forno para 245ºC.  Deixei 20 minutos assando com a tampa e depois a retirei, e mais vinte minutos para dourar o pão.  Com cuidado extremo retirei o pão e coloquei numa grade para esfriar completamente.  

     Recoloquei a panela tampada no forno ainda aceso, deixei uns 10 minutos, pois já estava quente e coloquei o segundo pão. Como o primeiro ficou bem moreno resolvi tirar o segundo pão antes dos 20 minutos finais com a panela já destampada…foram uns 12 minutos sem a tampa para dourar. Deveria ter deixado os vinte…

DSC07385

     Enfim, um ficou um pouco mais claro que o outro. Um foi de presente para meus pais, afinal a caçarola de ferro foi presente deles…nada mais justo que agradá-los com alguns frutos do presente! E o outro está aqui esperando para ser degustado…  O deles já foi inaugurado…no lanche da tarde com manteiga e queijo prato orgânico! Demais de bom! Minha caçarola mineira não deve nada a uma Le Creuset…que um dia ainda terei…serão amigas a dividir o armário das panelas e o forno!

     Então, com esta receita, participo do Bread Baking Day #54, já curiosa para ver as delícias que os amantes de pão do mundo todo assaram para nosso deleite!

xxxxxxxxxxxxxxxxx

DSC07383DSC07389

     I have to say a word or two before writting the recipe in English…

     I haven´t participated in a long time in Bread Baking Day, for some time I have been quiet silent in the blog, even though I did not stop baking at home…after all, we have to eat, don´t we?

     I almost made the last BBD, but my schedule got mixed up and I didn´t post in time…so I really wanted to participate in this one, specially because is hosted by Stefanie (whose blog I really like) and the theme is “Overnight”.

    I got a Dutch Oven from my parents and was really excited to try to bake on it! This was the perfect time! The recipe is wonderful, very tasty and if you have time and are an organized person you´ll do great! I did it with a 20 months old holding my legs and running around the house, so you´ll be fine! Trust me!

DSC07393

    The recipe is from Six Top Food blog and I gave it a twist to fill my needs and taste.

Pain à l’ancienne

Ingredients

  • 765g Bread flour 
  • 16g  Salt 
  • 12g Instant yeast
  • 538 to 680g Ice cold water

Procedure

  1. Combine the flour, salt, yeast and 538g of water in your mixer bowl and using the paddle, mix for 2 minutes. Use the extra water if the dough seems to dry and extra flour if it’s too wet. I used almost all the water.
  2. Scrap the roughly mixed dough off the paddle and switch to a dough hook.
  3. Mix for 5 to 6 minutes until the dough passes the window pane test. This means taking a small amount of dough, rolling it in your hands and stretching it out so you can see through it. If it tears, get back to work. The dough should be sticky.
  4. Or use your bread machine to mix the dough…like I did!
  5. Transfer the dough to an oiled bowl, cover with plastic wrap and refrigerate overnight. * I had to switch bowls…at the middle of the night I went to take a peek and sensed the dough would mess my fridge…so don´t be cheap, use a biggg one.
  6. Early the next day take a peek. My dough was beautiful, almost doubled.
  7. Leave the dough in the bowl out at room temperature for 4 to 5 hours. I left mine almost 6h…hettic morning!
  8. The dough should have risen at least twice.
  9. Pour about 1/2 cup of flour on the counter to gently place the dough on. Don’t play with it too much! Sprinkle flour on it as well as under.
  10. Stretch the dough to about 8″ x 6″ and cut in half width-wise. Let the dough relax for 5 to 10 minutes.
  11. Place the Dutch Oven (lid on) in the oven and let it get really hot, 500F, about 1 hour.
  12. Shape your breads, I decided to go with shubby ones. Made cuts with a razor and placed each one (2 in total) in a plastic placemat with cornflour under the loaves. Be generous or they will stick to the placemat!
  13. I let them proof while the oven was getting very hot, about one hour. 
  14. Extra careful put the first loaf inside the Dutch Oven, try to slide it gently.  Place the lid on and decrease the temperature to 475F. Bake for 20 minutes, remove the lid and leave 20 minutes more to give the golden brow to the crust. 
  15. Again, use the mitts and remove the bread from the oven. Let it cool in a rack.
  16. To bake the second loaf, put the Dutch Oven in the oven again, lid on, wait 10 minutes and then put the other loaf.
  17. The first one got really browned so I decided to cut the last 8 minutes of baking, lid off. Should have left the entire time…oh well…

DSC07380

    Beautiful, tasty and so much fun to make! It´s so worth it! Happy baking!

    Yielded 2 loaves, 600g and 700g each.

    Store in cloth bag to preserve the cruch.

DSC07385

6th World Bread Day–Lemon Sour Cream Bread

16 out

DSC04993image

(Scroll down for English please)

Seis anos de World Bread Day, lindo evento que exalta as maravilhas de fazer pão.  Adotado pela Zorra do blog Kochtopf, reune amantes de pães pelo mundo, dividindo histórias e receitas.

Já consegui me organizar para participar em 2007, 2008, 2009, 2010 e agora este ano.. se não fosse a Angela me lembrar, quase deixei passar em branco. Obrigada, querida!

Esse pão é daqueles que perfuma a casa, conquista pelo visual e pela textura e sabor, além de ser fácil de fazer. Outra receita com limão siciliano…uma paixão por aqui.

A receita veio do King Arthur Flour, em inglês aqui e em português com tradução livre:

Lemon Sour Cream Bread

1/2 xíc sour cream (já usei iogurte e também buttermilk* de outra vez)

2 colheres (sopa) de água

2 colheres (sopa) de manteiga (temperatura ambiente)

1 colher (sopa) de zest de limão siciliano

3 xícaras de trigo branco

1/2 xícara de farinha de amêndoas (não usei pois não tinha)

3 colheres (sopa) de açúcar

2 colheres (chá) de fermento biológico seco ou 15g de fermento fresco

1 1/4 colheres (chá) de sal

3 ovos grandes

1 colher (chá) de zest de limão  siciliano ou 1/8 de colher (chá) de Fiori de Sicilia ou 1/4 colher (chá) de óleo de limão

*buttermilk: numa xícara de leite integral coloque uma colher bem cheia de vinagre ou limão para talhar e espere 5 minutos.

Aqueça o sour cream (iogurte ou buttermilk) com a água até estarem mornos, mexendo sempre.  Junte a manteiga e mexa até que tenha derretido. 
Em outra vasilha misture o zest de limão, trigo, farinha de amêndoas (se usar), açúcar, fermento e sal.  Juntes os ingredientes secos aos úmidos e depois acrescente os ovos e o zest adicional (ou o óleo de limão).  Misture até que a mistura esteja homogênea, cubra com um pano e deixe descansar por 15 minutos.

Sove a massa até que esteja elástica, juntando aos poucos água ou trigo se necessário.  Coloque num bowl untado com óleo, cubra e deixe crescer por 1 1/2 h a duas horas, até que dobre de volume.

Coloque a massa crescida numa superfície enfarinhada e amasse suavemente algumas vezes.  Molde o pão (é um pão grande, se não tiver uma forma grande, faça dois) e coloque para crescer novamente numa forma untada com manteiga por aproximadamente 1 1/2 h.  Asse em forno pré-aquecido até que esteja dourado e passe no teste da batida (bata com os nós dos dedos na parte de baixo do pão até que saia um som oco).

Retire do forno e coloque o pão numa grade para esfriar.

DSC05003(os limões lindos que ganhei novamente do pediatra das crianças, enormes!)

Na MPF: coloque na cuba untada com óleo os líquidos e depois os ingredientes secos. Use o ciclo amassar.

Depois do ciclo completo retire a massa da panificadora e molde o pão, coloque para assar numa forma untada com manteiga e deixe crescer novamente até dobrar de volume. Cresce bem, se não tiver forma grande é melhor fazer dois pães.

Asse em forno pré-aquecido até  que esteja dourado e passe no teste da batida (bata com os nós dos dedos na parte de baixo do pão até que saia um som oco).

Retire do forno e coloque o pão numa grade para esfriar.

xxxxxxxxxxxxxxxx

DSC04999

World Bread Day is completing 6 years today! This great baking bread event adopted by Zorra from Kochtopf gather bread lovers all over the world sharing stories and recipes.

I´ve managed to participate in 2007, 2008, 2009, 2010 and this year almost passed blank if  dear Angela hadn´t reminded me.  Thanks my friend!

This bread is one of those that perfumes your house, conquer by its looks and texture, and the flavor… also is easy to make! Another recipe using lemon, a passion around here!

The recipe comes from the wonderful site King Arthur Flour.

Lemon Sour Cream Bread

1/2 cup sour cream (I´ve used yogurt and also buttermilk*)
2 tablespoons water
2 tablespoons soft butter
1 tablespoon lemon zest
3 cups King Arthur Unbleached All-Purpose Flour
1/2 cup almond flour or very finely ground almonds (didn´t have)
3 tablespoons sugar
2 teaspoons instant yeast
1 1/4 teaspoons salt
3 large eggs
1/8 teaspoon Fiori di Sicilia or 1/4 teaspoon lemon oil, or 1 teaspoon lemon zest

*buttermilk: put 1 tablespoon lemon juice in a cup of whole milk, wait 5 minutes and use.

Warm the sour cream and water to lukewarm in a microwave, or over very low heat, stirring constantly. Add the butter and stir until melted. (If you’re using a bread machine, as long as the butter isn’t super-cold you can skip this step; just put the ingredients into the bucket of the machine in the order recommended by the manufacturer. You may also choose to bake the bread right in the machine; instead of programming for dough, program for basic or white bread.)
In another bowl, whisk together the lemon zest, flour, almond flour or almonds, sugar, yeast, and salt. Add the dry ingredients to the sour cream mixture, then mix in the eggs and flavor (or additional zest). Stir until the mixture becomes cohesive, then cover and set aside for 15 minutes.
Knead the dough — by hand, electric mixer, food processor or bread machine — until it’s smooth and elastic, adding a small amount of water or flour to make a smooth dough, if needed. Place it in a greased bowl, cover the bowl, and set the dough aside to rise for 1 1/2 to 2 hours, until it’s doubled in bulk.
Turn the dough out onto a lightly greased surface and knead it gently a few times. Form it into a log, and place it in a lightly greased 13 x 4-inch pain de mie pan; or divide it in half, and place it in two lightly greased 8 1/2 x 4 1/2-inch bread pans. Cover the pans, and allow the dough to rise for 1 to 1 1/2 hours, until it’s almost even with the top of the pan. Bake the bread in a preheated 350°F oven for 22 to 26 minutes, or until its internal temperature registers 190°F on an instant-read thermometer. Remove from the oven, remove from the pans after 5 minutes, and cool completely on a rack. Yield: 1 or 2 loaves, 16 servings.